Most factories that mass-produce products are trying to make them identically, regardless of whether we’re talking about phones, cars, airplanes, toasters, and more. After all, consumers purchase a product expecting it to provide them with a consistent experience. Therefore, excessive component variation affects the ability to create identical products, as many external factors, such as heat, humidity, different tooling or machines being used, etc, can affect components and cause even minuscule variations. These variations may seem small, but over time, they can result in defective products and assembly, quality, and performance problems.
To make a product consistently well, the components’ dimensions need to be consistent, especially those so-called CTQ (critical-to-quality) dimensions. So let’s look more closely at the risk of excessive and inconsistent component variation…
Component dimensions will vary
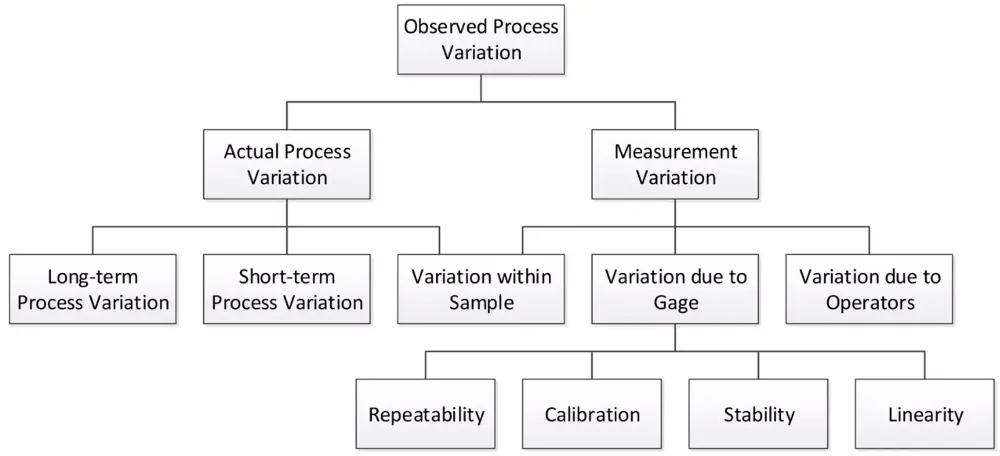
There’s just no way to fully eliminate component variation out of manufacturing processes. On top of that, there is variation in the measurements taken on the components simply because of the measurement system, which itself can introduce a bias or be executed inconsistently by different operators with different measurement instruments, etc.
I found this graph about how to analyze a measurement system and its variations on SlideShare which shows that even measuring can have variations:
Variation must be kept to a minimum
Let’s take a very simple example that everybody can understand: LEGO. The LEGO bricks are relatively simple plastic parts made of ABS and produced in the millions. They must fit into each other. The tolerance is extremely small at just 1um tolerance (1 thousandth of a millimeter). That means that there may still be incredibly small variations in dimensions, but they have to be within a limit to be acceptable.
As I wrote in this blog post about statistics Chinese factories can understand:
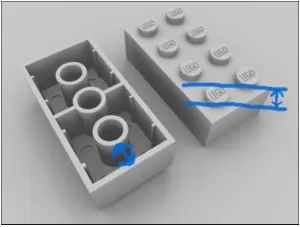
Lego bricks have to fit together nicely. But what does “fit together nicely” mean? Some dimensions need to be consistently the same, with very little variation. For the sake of this exercise, let’s take say there are 2 CTQ characteristics:
- Diameter of the male parts
- Distance between female part and the wall
By measuring those dimensions on the PRODUCT, you will know the PROCESS capability.
Why must the tolerance be so tight? Because if the round peg is a little bit too large it will either simply not fit or will require far more strength to assemble into the corresponding hole than is practical.
And that’s only half of the story. If the round peg is a little bit too large and the corresponding hole is a little bit too small, assembling them might be impossible!
Now, let’s just go back to the first half of the equation to keep things simple. The round peg has to have a diameter that is very close to the target value. And so if we unpack that, there are two topics to pay attention to:
- It must be centered around the target value which will have tolerance limits. If they are, on average, the target value plus 0.5%, for example, that is a huge problem, and most of the manufactured parts will be too large.
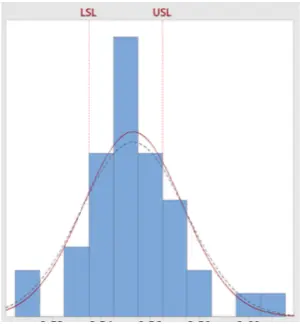
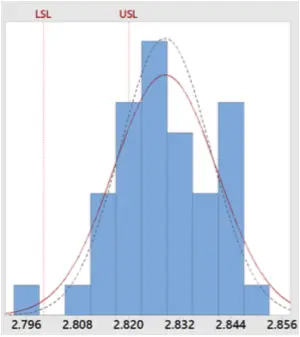
We can see an example of this from that blog I mentioned:Let’s say you measure the diameter and distance values on 40 LEGO pieces.
You find that the diameter value is often out of specifications (LSL = lower specification limit; USL = higher specification limit).

But the distance value is very often above the specification. This is more serious and should be worked on in priority.

- One has to look at the dispersion of the values. If they are mostly concentrated around their average value, that’s much better than if they are widely dispersed. If they are widely dispersed, a large proportion of the manufactured parts will be either too large or too small. If they are tightly concentrated around the average, then the variation is minimal, and that brings strong benefits when assembling the parts into the finished product.
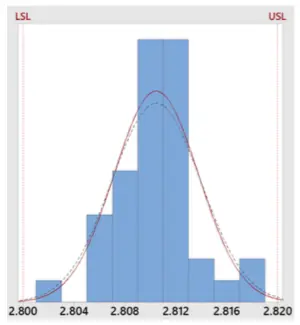
Again, going back to the example of the LEGO blocks from the blog post I wrote some time ago, you can see how the measurements should look once the factory has made changes to the injection mold, temperature, pressure, time, etc, to improve the products:You make changes to the mold and you control the temperature, presure, and time during the injection process, [and the results improve and are more in line with average values within the LSL and USL]

All the data are within specification. However, the capability index (Cp) is still below 1.00, which is often considered the very minimum. You might need to make further improvements to ensure the variation gets lower, for example by checking the polymer batches the supplier sends to the factory.
How can one see if the components’ dimensions are not kept under control and there is an excessive variation?
Here are a few typical symptoms of component variation.
- During assembly, you will see operators adjust or fine-tune the fit between the parts. That might be okay when an automotive operator assembles the back door onto the car frame and makes small adjustments. But, that is absolutely not OK when a mobile phone gets assembled.
- You will also see the operators trying to force-fit some parts into other parts, sometimes using a hammer or something of the sort. That can generate defects, and it is probably not an efficient and repeatable process… It can also trigger some other issues down the road and make the product less reliable and less durable.
- The operators will also have to look for different parts to find those that fit the best. For example, if the male part is above its tolerance and the female part is below its tolerance, they will probably not fit. So, the operator will be tempted to look for a female part that is above its tolerance. The fit would be much better. The problem here, obviously, is an enormous amount of wasted time. And possibly, at the end of the assembly run, some parts that just could not fit any other part.
- The final product might also be noisier than it should and/or generate relatively high vibrations that might be unpleasant to users or surrounding people. That also invariably leads to a shorter product life and a higher number of returns from users.
We hope it’s now clear what dimensional variation is about, and why it is not desirable. In short, the less component variation, the better. This leads us to the next question…
How are manufacturers supposed to reduce component variation?
The key, as always, is NOT to inspect at the end of a cutting or machining process and then sort out the bad ones. That is very costly and time-consuming, and some of the issues will still make it all the way to assembly since no inspection is perfect.
The key is to work on dimensional control.
Let’s look at a tool that is commonly used when it comes to certain manufacturing processes in the automotive or aerospace industries – the control charts. Some of those tools are about one hundred years of age!
The idea is basically to keep measuring some of the CTQ points to plot them on a graph, and to use the graph to provide certain signals while disregarding the ‘noise’. When it is clear that there is an issue, the operator sees that he needs to readjust the process.
Here is a simplified example from the Deming Alliance website (and it actually shows a shift in the underlying process):
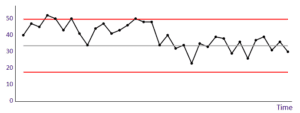
Now purists will say that control charts are only to be used on a stable process, and that means good process manufacturing control (which involves preventive maintenance, staff training, and a lot more) is a must-have.
What we have done on several occasions where dimensional control was quite important was track variation based on the capability index (Cp, or under a more refined form Cpk).
For OEM automotive parts, for example, a Cp of 1.33 is often required as the minimum for CTQ dimensions. Below a Cp of 1.33, the underlying process is considered as not capable of delivering the desired result consistently.
Process engineers and operators can be given a target of a certain Cp or Cpk value, and they need to work to improve that value and keep it as high as possible over time. By the way, that also necessitates involving key suppliers in many cases.
When should a lot of this work be done?
Simply, before mass production starts.
As we wrote above, automotive parts must come with a Cp of 1.33. That must be demonstrated as part of the PPAP approval process (a more in-depth value of our NPI process) based on small pre-production pilot runs done by the component manufacturer. Without that approval, an automotive part cannot be made in large series and sent to a car assembly plant.
Best practices to reduce component variation
Coming back to our world of manufacturing mid-volume electronic devices, here are a few good practices to keep in mind:
- When designing a product, follow the general DFMA (Design for Manufacturing & Assembly) good practices. In particular, the first step is to try and pick standard off-the-shelf parts made by qualified manufacturers wherever possible.
- Don’t treat tolerances and the selection of CTQ values as an afterthought in your CAD drawings.
- Try to make the product design more robust by keeping some room for dimensional variation. In doubt, using Taguchi’s statistical methods is a good approach.
- If components are purchased from suppliers, be very clear from the start about the requirements and ask for their risk analysis, to be integrated in the process FMEA.
- The pre-production phase is extremely important. It is not a formality. Don’t go through it ‘as fast as possible’. The purpose is to validate that the product and the process were designed in a way that allows for good production.
- One very good pre-production practice is to get the custom-designed components to be made in small batches several times. That allows for an understanding of the capability of the underlying process. Unfortunately, when the planned order quantity is not high, suppliers do not accept making several low-quantity batches… and customers are often in a rush to deliver thousands of products. Well, all that leads to higher risks in production, since the validation was not done ‘by the book’.
****
Unsure about your components? Get in touch for a chat and we’ll offer you some advice!

